|
 Design Tutorial Series: Design Tutorial Series:
Part 2 Structure
 Planning your first web site can seem like a daunting task, and in a way, it is. Careful and practical planning can make the job much easier - not to mention, more fun to boot! The second step in your design plan should be deciding your site structure. In the first step (Part I of this series) , you were advised to list the contents of your sitemap. This is critical, since it will lead you to decide on the structure for this listed content. Planning your first web site can seem like a daunting task, and in a way, it is. Careful and practical planning can make the job much easier - not to mention, more fun to boot! The second step in your design plan should be deciding your site structure. In the first step (Part I of this series) , you were advised to list the contents of your sitemap. This is critical, since it will lead you to decide on the structure for this listed content.
Site Structure is your Foundation
The best way to begin to develop your site structure is to make a prototype of the folders and pages that you will include on your site on your computer's hard drive. For instance, if your site is intended to showcase your art work, you might create a new folder on your C drive called Junes_gallery.
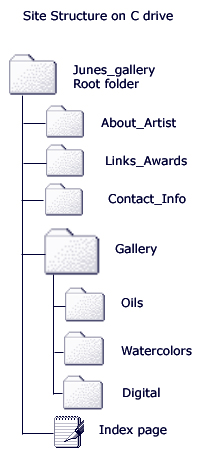
Using the image at the right as a guide, create a folder within the first folder (e.g. Junes_gallery) for each major section of your planned site.
You can see in the image that there is a folder for About the Author, Links and Awards, a main Gallery folder with three individualized folders within the Gallery folder: Oils, Watercolors, and Digital Art, and the main Index page that is placed on its own within the the main site folder. This index page is the first page that anyone who visits your site will see. Within each of the folders and subfolders, you will place the individual pages, graphics, multimedia, sounds, Flash movies, .....whatever you decide to put on your site. It is VERY useful to create this sort of structure and place each graphic, page, etc. in the appropriate folder while you are working on the development of your site. This not only helps you be organized, it also facilitates previewing the site as you work on it, and in the final uploading of your work to your web hosting server. This sort of organized structure on your own computer also acts as a ready to access backup to your web site. It is not unheard of for a site to be damaged, hacked or for some other reason dumped from a system. If you have it stored on your computer, and especially if you work on any additions, revisions, or editing from those same folders over time,...you can instantly repair or even upload your entire site again within a few minutes using a reliable ftp (file transfer) program.
This first step should be followed, whether you are building your site by hand coding the html yourself, using an html editor like Dreamweaver or Coffee Cup, or even a built in html editor available on many web hosting servers. It is always a good idea to keep a copy of all of your coding in this computer based folder system, even if you use a free web service where you can use prefabricated templates, such as Geocities. It is not being paranoid to back everything up!
You may also wish to create a folder called Images to upload all of the images you use on the entire site in one uniform folder. Likewise, you might also want to store other similar files such as sound files, documents, newsletters, and so on in their own separate files. It is up to you. The key is to visualize how you want your site structured, and create the structure on your computer to set up a workable folder space to organize the various pages you will develop.
Once this is done, you can begin to work on your navigation, and deciding the name of and number of pages that will be included in each of the major sections. Part III will help you with these next steps.
to page 3 |